Narzędzia użytkownika
Narzędzia witryny
Pasek boczny
en:statpqpl:usepl:arkpl:formcellpl
Variable properties
For each column of the worksheet, we can set its properties such as codes, labels and format. Setting the properties of a variable is possible by
- selecting
Variable Properties→Codes/Labels/Formatfrom the context menu on the number above the column header, - by double-clicking on the number above the column header - if it was specified in the program settings (corresponding double-click action).
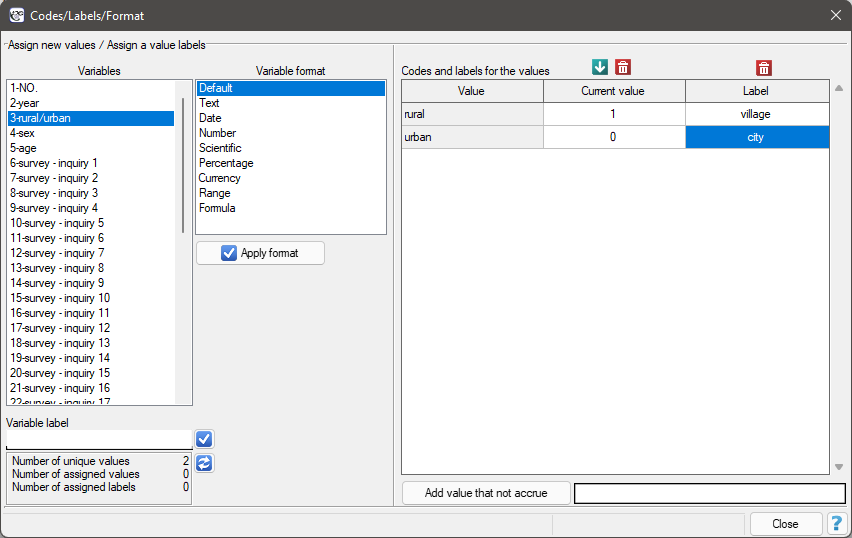
Codes and labeles for the values – are assignable to each value in the column.
Current value - By filling in the codes we set the values to be valid in the given column. As a result, the values taken for calculations will be changed (in the background) to assigned codes (valid values).
Label - The values you enter under Lable are used in reports and charts for the user-defined result report.
Variable label - is assigned to the header of a given column. This is usually a brief description of the variable's contents. The variable label is used instead of the column header (variable name) in reports and charts for clearer description of the results. The use of the variable label is optional and depends on the program settings.
Each worksheet cell (including a column heading) may contain a maximum of 40 characters. Texts containing national characters are also allowed. Entered values can be formatted as:
- default - default format is a format in which the program automatically recognizes the contents of the cell in the range - numeric data, text data;
- text - in text format, data are interpreted as text (alignment to the left edge of the cell);
- date - In date format, numeric data is interpreted as consecutive date values, so value 1 means 1899.12.31, value 2 means 1900.01.01 etc. Depending on the selected date format, you can also enter data in text format, these are:
2010.12.31
31.12.2010
12.31.2010
2010/12/31
31/12/2010
12/31/2010
2010-12-31
31-12-2010
12-31-2010
Monday…
January…
For the format Monday…, the value 1 indicates Monday, …, 7 indicates Sunday, for the format January…, the value 1 indicates January, …, 12 indicates December.
- time - In the time format, numeric data is interpreted as consecutive time values, the fractional part of the number means the number of milliseconds since midnight divided by the total number of milliseconds of the day (86400000), so the value 0.000694444 means 00:01:00, the value 0.041666667 means 01:00:00, the value 0.999988426 means 23:59:59. Depending on the selected time format, it is also possible to enter data in text format, these are:
18:31:58
18:31
12/31/2010 18:31
12/31/2010 18:31:58
- numerical - real numbers in this format are in decimal form with either a comma or a period separating the whole from the fraction (depending on the settings you have chosen in ''Settings'' in
Decimal Separator), you can set the number of decimal places and the thousandths separator; - scientific - that is,
 , where the base is the mantissa of
  , and the exponent
  is an integer; that is, using M times 10 to the power of E, where the base is the mantissa of M and the exponent E is an integer; just as in numerical format, it is possible to set the number of decimal places;
 - percentage - changing a number to a percentage by multiplying it by 100 and displaying it with the \% symbol; as in numeric format, it is possible to set the number of decimal places;
- currency - are used for monetary values - this allows you to add a currency symbol; as in the numeric format, it is possible to set the number of decimal places;
- range - written with upper and lower limits; as in the numeric format, it is possible to set the number of decimal places;
- formula - values calculated according to the formula assigned to the column; the value is automatically recalculated when any of the input data is changed.
When you open a new sheet, a default format is set for each cell.
The entire header row is permanently set to text format. User-defined formats can be set for the rest of the sheet. Formatting is not done for a single cell, but for the entire column (except for its header).
In the worksheet, you can specify the column width using the mouse. To do this, use the mouse pointer to drag a line dividing the columns, narrowing or widening the column to the left of the selected line.
Additionally, you can set a different background color in each cell of the worksheet (after selecting the area to be changed). You can do it via:
- menu
File→Fill color …
- command
Fill colorin the cell's context menu.
en/statpqpl/usepl/arkpl/formcellpl.txt · ostatnio zmienione: 2022/02/09 20:36 przez admin
Narzędzia strony
Wszystkie treści w tym wiki, którym nie przyporządkowano licencji, podlegają licencji: CC Attribution-Noncommercial-Share Alike 4.0 International
